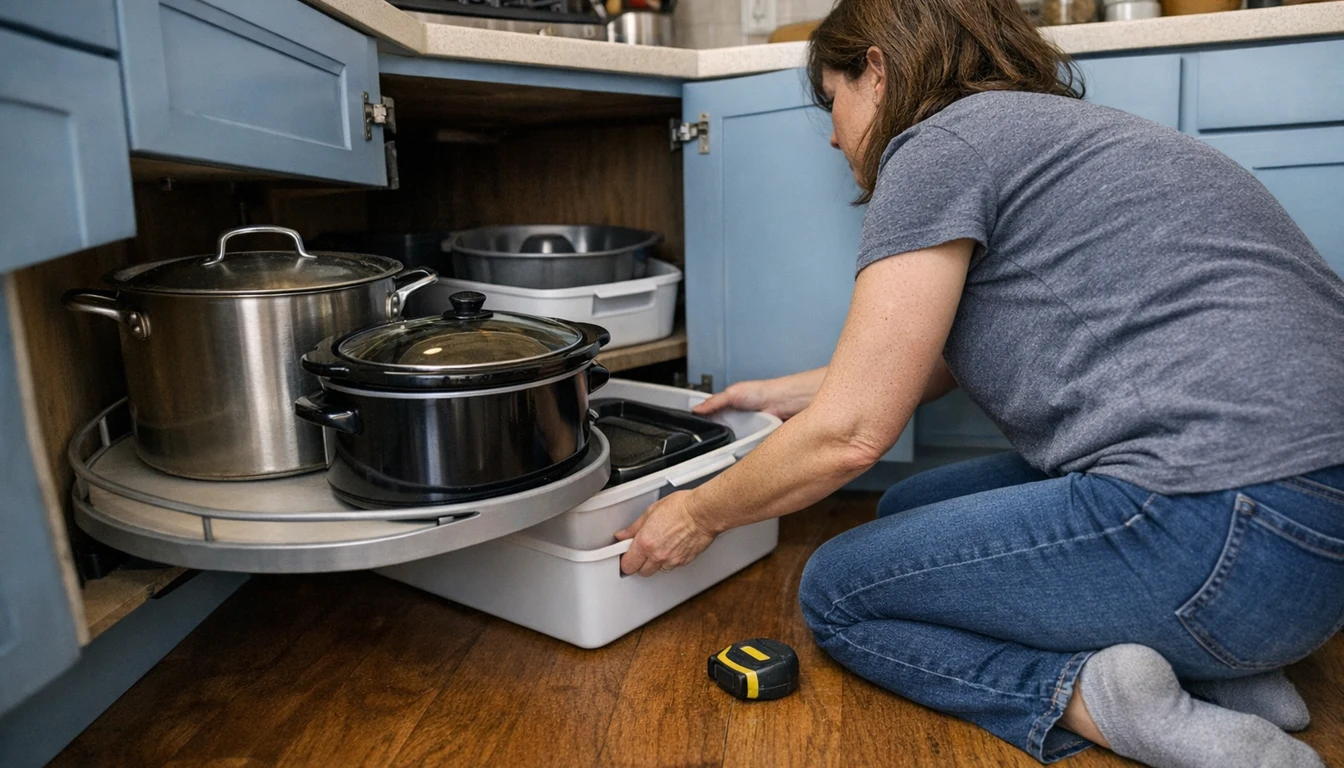
Last spring I spent ten minutes on my knees on the kitchen floor, one arm buried to the shoulder in the cabinet left of the stove, feeling around for the lid to my slow cooker. I found a bundt pan I forgot we owned, a bag of birthday candles and a lone oven mitt. No lid. That blind corner had swallowed it, the same way it swallowed everything that went in past the hinge.
That afternoon I started taking corner cabinet organization seriously. Over about six weeks I tried a turntable, a set of bins, a pull-out shelf and one idea that failed in two days. Below you’ll find which corner you probably have, what fixed mine, and what I’d skip.
Corner cabinet organization starts with knowing which corner you have
I didn’t know there were two kinds until I measured mine. It matters, because the fix for one is useless in the other.
- The blind corner: a regular-looking door on one side, and behind it a long dark tunnel that runs under the counter of the next cabinet. You can see maybe a third of the space. This is mine.
- The L-shaped or diagonal corner: either a door that folds in the middle or a door set at an angle across the corner. These often already have a built-in lazy susan, or the shelves are shaped for one.
Open the door, grab a tape measure and write down three numbers: the door opening, the depth to the back wall, and how far the space runs sideways past the opening. My door opening is 15 inches. The tunnel runs another 24 inches to the left. That 24 inches was the whole problem.
The front-and-back rule I use now
This one costs nothing and did more than any product I bought. The deep back of a blind corner is for things I use a few times a year. The front, the part I can see without kneeling, is for things I use every week.
In the back of mine now: the roasting pan, the big holiday platter, the bundt pan I rediscovered, and the turkey baster. In the front: the slow cooker (lid on, finally), the stockpot and the sheet pans standing on their sides. When I sorted it this way, I mostly stopped kneeling, because the things I need on a Tuesday are never in the tunnel.
It’s the same logic I used for the bottom layer in my post on how to organize deep kitchen drawers. Deep storage works fine for the roasting pan. It fails the minute daily stuff goes back there.
Lazy susan cabinet tips if you have the round kind
My sister has the diagonal corner with a built-in two-tier lazy susan, and hers drove her nearly as crazy as my blind corner did me. Things slid off the back edge and dropped into the gap behind the turntable, where you can’t reach them without taking the shelf out. She lost a box of pasta that way. It turned up eight months later.
What fixed hers, in the order she did it:
- She moved anything tall and skinny off the turntable. Bottles of oil and vinegar were the ones that tipped and fell behind.
- She put short bins with a lip on each tier, one category per bin. Snacks in one, baking stuff in another. The bin keeps things from creeping toward the edge when the shelf spins.
- She stopped storing anything in the wedge-shaped dead zone behind the turntable. It’s empty on purpose now.
If your corner holds canned goods, think about where it sits. Hers is right next to the range. The USDA’s shelf-stable food safety guide says canned food keeps best in a cool, dry place and that storage near the stove is a spot to avoid, so she moved the cans to the pantry side and put the baking pans by the oven instead. The pantry setup she copied is in my pantry organization ideas post.
Corner cabinet organization options, compared
This is everything we tried between her kitchen and mine, plus what I’d tell a friend about each. Install effort is the honest version: how long it took us with one drill and a lot of muttering.
| Option | Works best in | Install effort | What it fixed | The catch |
|---|---|---|---|---|
| Freestanding turntable | Diagonal corners, the front of a blind corner | None, just set it in | Spices and small jars stopped hiding | Useless in the tunnel part of a blind corner |
| Bins with handles, in a row | Blind corners | None | I pull the front bin out, then reach the next one | Heavy bins are a pain to drag from the back |
| Half-moon pull-out shelves | Blind corners with a wide enough door | An afternoon, mounting to the cabinet frame | Pots come to me instead of the other way around | Needs exact measurements and a door opening that fits |
| Swing-out blind corner unit | Big blind corners | A weekend, or a handyman | Reaches almost the whole tunnel | The biggest job and the biggest spend on this list |
| Built-in lazy susan with bins | Diagonal and L-shaped corners | None if it’s already there | Nothing falls behind once bins are on it | Tall bottles still tip |
| Leaving the back empty | Any corner | None | Nothing gets lost back there | You give up space you’re paying rent on |
For my blind corner, the winner was boring: two long bins with handles in the tunnel for the yearly stuff, and the front half left open for the slow cooker and stockpot. I measured for a half-moon pull-out and my door opening was about an inch too narrow for the one I wanted. If you rent, the bins are also the only option on this list that leaves zero holes behind, which is the same rule I follow in my small kitchen organization setup.
Three corner cabinet organization mistakes I made
- Buying before measuring. I bought a turntable first and it was too wide to get through the door opening. Measure the opening, not just the inside.
- Filling the tunnel with heavy pans. The cast iron went to the back because it was “rarely used.” Dragging a full bin of cast iron forward on my knees is how I learned to keep the back light.
- Not labeling the back bins. If I can’t see it, I forget it’s there. A strip of masking tape on the front of each bin now says what’s inside.
What didn’t work for me
I tried a hanging wire rack that hooks over the inside of the door. The idea was to free up shelf space for lids. In practice the rack hit the shelf every time I closed the door, and two lids popped out onto the floor. It lasted two days.
I also tried a pegboard panel on the side wall of the tunnel so I could hang the small pans. I couldn’t see it. A pegboard you can’t see is just a wall with holes in it.
And if you have small kids, one more thing. A lot of people turn a corner cabinet into overflow for cleaning supplies when the sink cabinet gets full. If that’s you, put a latch on it. The CPSC’s childproofing guide recommends safety latches and locks on cabinets for exactly that reason. Better still, keep cleaners in one place, and my under sink storage ideas post shows how I made room for all of ours there.
Deep shelves have the same back-row problem as a blind corner. For a tall food cabinet, the bins-as-drawers trick is in how I organize our pantry cabinet.
Grab the free printable: my Corner Cabinet Measuring Sheet, the three measurements to take, a front-and-back sorting list and a simple map of what lives where. Get the free sheet →
FAQ
What is the best way to organize a blind corner cabinet?
Put the things you use a few times a year in the deep back, in bins with handles so you can pull them out. Keep the front, the part you can see, for weekly items. If your door opening is wide enough, a half-moon or swing-out pull-out brings the back to you.
Are lazy susans good for corner cabinets?
They work well in diagonal or L-shaped corners. Put short bins with a lip on each tier and keep tall bottles off, since those tip and fall behind the turntable. In a blind corner, a turntable only helps in the front section.
What should I store in a corner kitchen cabinet?
Bulky things you don’t need daily: roasting pans, holiday platters, stockpots, small appliances you use now and then. Avoid storing canned food in a corner next to the stove, where it gets warm.
Tonight, open your corner cabinet and take the three measurements before you buy anything. Then pull everything out and sort it into two piles, weekly and a few times a year. The weekly pile goes in front. That alone got me off the kitchen floor.
Get my free Home Reset Planner
The calm, room-by-room planner I use to reset my whole home without the overwhelm. Join the newsletter and I’ll send it straight to your inbox.
No spam, ever. Unsubscribe anytime. — Lena
Keep reading — more on Home Organization

Turning a Bedroom Into a Closet Without a Remodel ($480)
Utility Closet Organization: The $40 Setup That Finally Stuck

Nursery Organization Ideas: A Calm Baby Room That Grows With Them